SCOPE
Use this method to determine concrete thickness by direct measurement in the plastic concrete pavement. Since measurements are taken during paving operations, any necessary adjustments to can be made to correct any deficiencies. This method is used to determine thickness on bid items of 3500 square yards or less in accordance with Article 2301.04.
The Engineer will determine identification of the limits of each lot and the random location of each measurement location. The engineer will determine and record the depths and calculate the average thickness.
DEFINITIONS
Section: All Portland Cement Concrete in a project of the same bid item of 3500 sq. yds. or less.
Lot: A portion of a section normally not more than 350 sq. yd. Each lot is represented by a randomly located plate that will represent the section.
EQUIPMENT
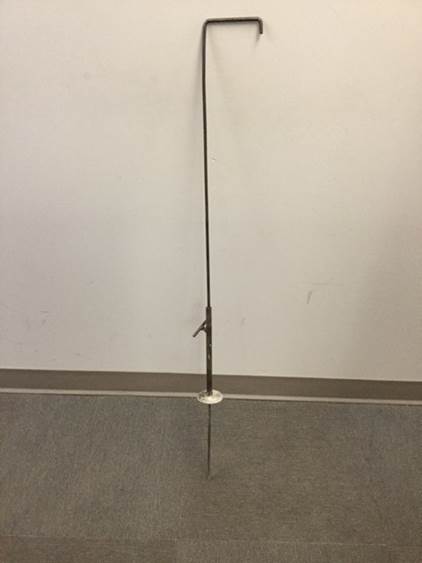
Measuring Probe Probing rod consists of a non-flexible rod with a minimum diameter of 3/8” and maximum diameter of 5/8” and sufficient length to penetrate the pavement thickness. (Figure 1.) A hemispherical tip may be desirable to prevent aggregate interference. A top plate with a hole centrally located and a locking device to secure the tope plate to the probing rod at 90 degrees.
Base Plate Rigid plate with minimum area of 16 square inches. MIT SCAN T2 thickness plates secured to the base with a nail are sufficient.
Tape or ruler capable of measurement to the nearest 1/16 inch.
PROCEDURES
A. Test Locations
1. Divide the section longitudinally into 350 sq. yd. lots. If the last lot of the pavement section is less than 250 sq. yd. group this lot with the last full 350 sq. yd. lot, otherwise treat lots greater than 250 sq. yd. as a lot. Test once every 350 sq. yd. or a minimum of three locations.
2. Test Location. Probe one random area in each 350 sq. yd lot a minimum of three feet from the edge. Randomly select the right or left side by a random method such as a coin flip.
3. For irregular areas, probe once per area greater than 100 sq. yd.
B. Procedure
1. Place base plates at random locations determined. Place a minimum of three feet from any reinforcing steel and midway between baskets. Secure plates to subbase with nail.
2. Make sure locations are well referenced to find after paver has passed.
3. After paver has passed, assemble the probing device. Keep rod perpendicular to the surface and insert the rod into the plastic concrete until it strikes the base plate.
4. Slide the top plate down the rod until it makes contact with the pavement surface and lock the plate to the rod.
5. Withdraw the probing device. Measure the length from the top plate to the end of the rod to the nearest 1/16 inch.
6. Record the result.
7. Repeat steps at each measurement location.
C. Records
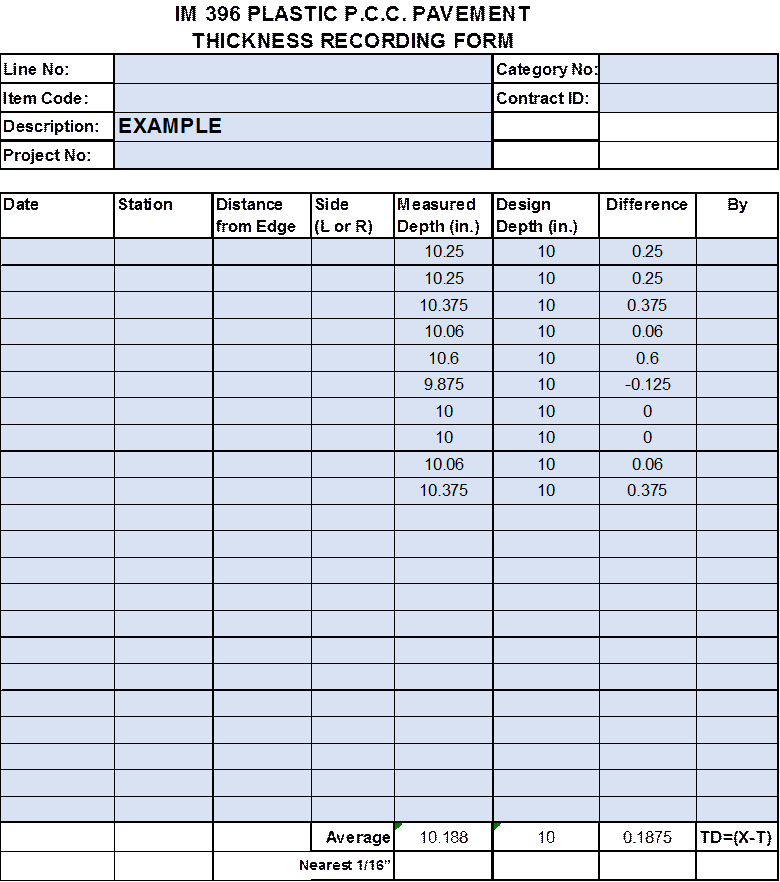
Report the results on the form. See Example Form.
D. Reporting
1. Average all measurements for the section. Report the average thickness to the nearest 1/16 inch as a decimal.
|
1/16 |
1/8 |
3/16 |
1/4 |
5/16 |
3/8 |
7/16 |
1/2 |
9/16 |
5/8 |
11/16 |
3/4 |
13/16 |
7/8 |
15/16 |
|
0.06 |
0.13 |
0.19 |
0.25 |
0.31 |
0.38 |
0.44 |
0.50 |
0.56 |
0.63 |
0.69 |
0.75 |
0.81 |
0.88 |
0.94 |
E. Deficient Areas
1. If deficient areas are found, represented by a measurement deficient in length by 1 in. or more from design thickness, are to be replaced. These areas will be determined by drilling a core 50 ft. in each direction longitudinally at the same transverse location from the deficient probe measurement. Drilling will be continued at 50 ft. intervals until a core is obtained which is not deficient by 1 in. or more from design thickness. Interpolate between this core and the adjacent core to determine the limits of the deficient area. This is the area to be removed and replaced at contractor’s expense or left in place with a price adjustment in accordance with Article 2301.05.
2. If deficient area is removed and replaced, remove the measurement deficient by 1 inch or more from the other measurements to determine the average thickness of plastic concrete by probing.

Figure 1. Measuring Probe
Example Form
