
Content Information
On this page...
AST - Above Ground Storage Tank
DTM Inclusion (Line = No, Point = No)
Shoot the center of all above ground tanks except LP tanks. Examples include storage tanks that contain chlorine, hazardous fluids, and gasoline or diesel fuel. Record the fluid material description in the PD field.
EXAMPLE: Use the Side Shot function of the data collector
Point Description = 3x12 chlorine tankv on conc pad
BB - Billboards
DTM Inclusion (Line = No, Point = No)
Shoot both ends of the billboard and create a survey chain from them. Describe any concrete footings, license numbers, and construction materials in the comments. Use the point description for a short description of billboard. Comments should include the following:
Number of Posts & Concrete Footings (if applicable).
Size of concrete base if any
License Number (if applicable).
Type of Post & Sign
EXAMPLE: Use the Side Shot function of the data collector
Point Description = Lions Club, 4 Post 2' Cir. C. Footings #78-325 Post & Wood Sign
BBB - Bottom of Bridge Beam
DTM Inclusion (Line = No, Point = No)
Use this feature to enter the low steel profile of bridge beams other than centerline. This feature is only required on bridge widening projects.
EXAMPLE: Use the Side Shot function of the data collector
Point Description = Low Steel, 7.32 X 54.9 CONC I-BEAM BRIDGE, Etc.
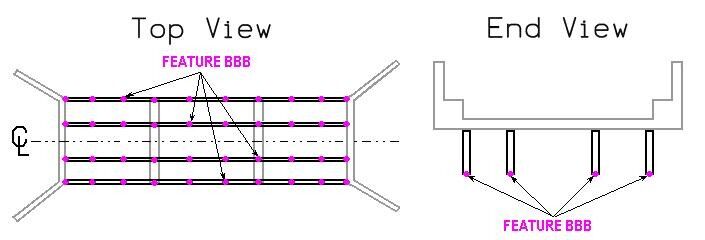
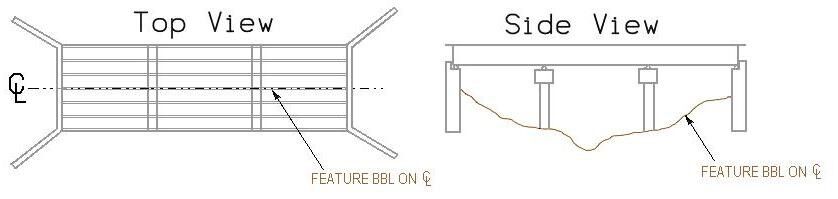
BBL - Profile under the Bridge
DTM Inclusion (Line = No, Point = Yes)
Use this feature to record the information on the centerline ground profile under all bridges.
EXAMPLE: Use the Side Shot function of the data collector
Point Description = Profile under bridge
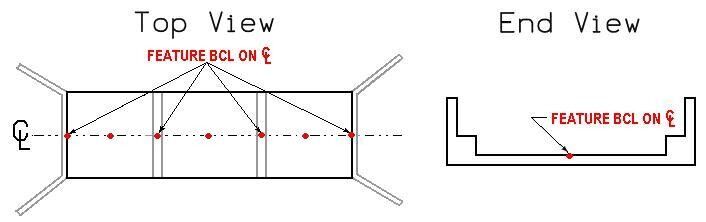
BCL - Bridge Centerline
DTM Inclusion (Line = No, Point = No)
Use this feature to enter the profile of all bridge decks. A shot should be taken at the beginning of the bridge, end of the bridge and over each pier. Additional shots may be required so that the maximum distance between shots is 50’.
EXAMPLE: Use the Side Shot function of the data collector
Point Description = BRIDGE PROFILE, 7.32 X 54.9 CONC I-BEAM BRIDGE, Etc.
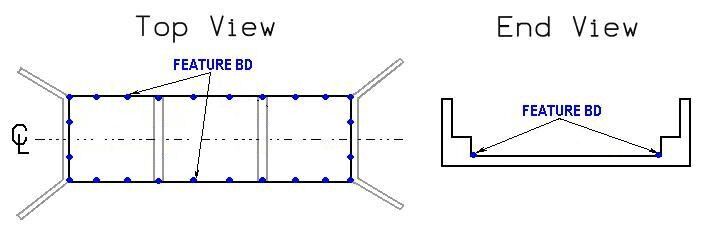
BD - Bridge Deck
DTM Inclusion (Line = No, Point = No)
Use this feature on all bridge deck shots. A bridge deck point is used to code all shots that fall on the floor of a bridge. Point examples include beginning/end of bridge deck, the gutter along the wheel guard as well as all other points that represent the deck of a bridge. This feature is also used to draw the outline of the deck in the plan view.
EXAMPLE: Use the Side Shot function of the data collector
Point Description = End bridge floor, deck over pier, deck at gutter
BIN - Grain Bins, Corn Cribs, Etc.
DTM Inclusion (Line = Not Used, Point = No)
Use this feature for a circular bin. Shoot one shot on the center of the bin. The diameter of the bin should be recorded in the point description field.
EXAMPLE: Use the Side Shot function of the data collector
Point Description = 9.14m Dia. Grain Bin
BL - Breakline (Field)
DTM Inclusion (Line = Yes, Point = Yes)
Use this feature in DTM surveys to enter shots along a ground break. Shoot the required spacing necessary along the break-line to create 3-D string-lines.
EXAMPLE: Use the Side Shot function of the data collector
Point Description = TOE SLOPE, BACKSLOPE, Etc.
BLD - Building
DTM Inclusion (Line = No, Point = No)
All buildings except latrine, circular bin or silo. BLD can also be used for canopy of buildings,pump iIsland canopies, foundations and buildings. BLD is to be used at the corners of the feature, with a survey chain number, to draw a line in the shape of the feature. The description for buildings should be the type of building or the name of the business. The address of a building should be recorded in the comments.
EXAMPLE: Use the Side Shot function of the data collector
Point Description = Foundation, 906 1st Street
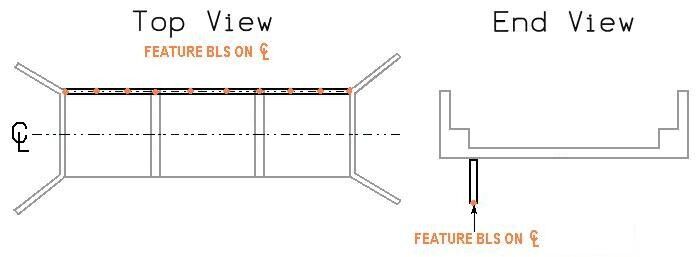
BLS - Bridge Low Steel
DTM Inclusion (Line = No, Point = No)
Use this feature to enter the profile of the bottom of the lowest beam on all bridges.
EXAMPLE: Use the Side Shot function of the data collector
Point Description = Low Steel, 7.32 X 54.9 CONC I-BEAM BRIDGE, Etc.
BM - Benchmark
DTM Inclusion (Line = Not Used, Point = No)
Use this feature in ALL surveys when a bench is located.
EXAMPLE: Use the Benchmark function of the data collector
Point Description = I.H.C BM ON INLET HDWL, Etc.
BNK - Stream Banks
DTM Inclusion (Line = Yes, Point = Yes)
This feature code is to be used to represent the farthest outside edge of all stream banks. Use this feature code with a survey chain number to draw a line along all banks of streams, rivers and draws. A point description is optional.
EXAMPLE: Use the Side Shot function of the data collector
Point Description = R1 (Optional)
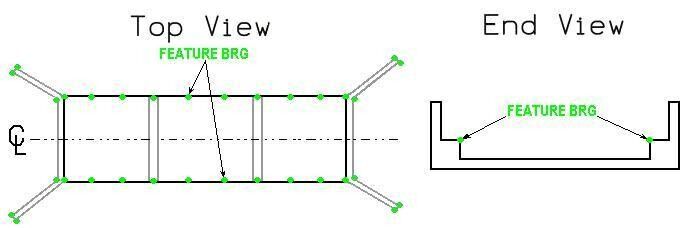
BRG - Bridge
DTM Inclusion (Line = No, Point = No)
Use this feature with survey chains on all items needed to create a plan view drawing of all bridges, including the curbs, sidewalks, wings and abutments.
EXAMPLE: Use the Side Shot function of the data collector
Point Description = Abut, Pier, Curb, etc.
C - Center of Road
DTM Inclusion (Line = Yes, Point = Yes)
Use this feature in all surveys to shoot a break-line profile on a mainline or a side road centerline. This is used as a breakline only. The centerline alignment shown on the plans is created in a separate process.
EXAMPLE: Use the Side Shot function of the data collector
Point Description = CL of IA 30
CAV - Cave
DTM Inclusion (Line = Not Used, Point = No)
This feature code will place a symbol at the entrance of a cave. Take one shot at the cave opening.
EXAMPLE: Use the Side Shot function of the data collector
Point Description = Cave Entrance
CIS - Cistern
DTM Inclusion (Line = No, Point = No)
This feature will place a symbol representing a cistern. Take one shot at the approximate centerline of cistern. Enter the diameter of cistern in the point description field.
EXAMPLE: Use the Side Shot function of the data collector
Point Description = 3.04m Diameter cistern
CON - Concrete or AC Slab
DTM Inclusion (Line = Yes, Point = Yes)
Use this feature when you shoot any PCC or HMA that is not a road, entrance or parking lot.
EXAMPLE: Use the Side Shot function of the data collector
Point Description = CONC CORNER OF 3m X 6m CONC SLAB
COR - Column Round
DTM Inclusion (Line = No, Point = No)
Use this feature in ALL surveys when shooting the center of a round column under a bridge.
EXAMPLE: Use the Side Shot function of the data collector
Point Description = 30” Cir bridge column
COS - Column Square
DTM Inclusion (Line = No, Point = No)
Use this feature in ALL surveys when shooting the center of a square column under a bridge.
EXAMPLE: Use the Side Shot function of the data collector
Point Description = 1.5’x1.5’ bridge column
CP - Control Point
DTM Inclusion (Line = Not Used, Point = No)
Use this feature in all surveys when any horizontal project control point is shot. The comment should include type of point and if the point was set or found.
EXAMPLE: Use the Side Shot function of the data collector
Point Description = PI, SET IRON PIN
CRP - Corporation Line
DTM Inclusion (Line = No, Point = No)
This feature requires at least two shots with a survey chain number to draw a corporation line.
EXAMPLE: Use the Side Shot function of the data collector
Point Description = Approx. Corp line or Corp line (if certain of location)
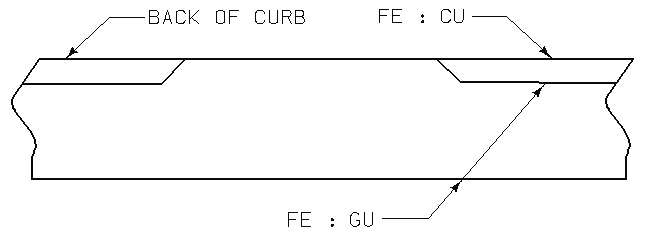
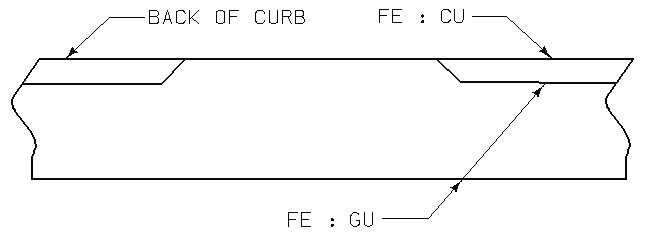
CU - Curb
DTM Inclusion (Line = Yes, Point = Yes)
Use one survey chain to draw the back of the curb. Use the point description field to describe the overall width of the curb and gutter. Also note the curb size in the point description field. The curb line can be shot through the intakes as if the intake isn't there.
EXAMPLE: Use the Side Shot function of the data collector
Point Description = 2.5' C&G with 0.7 Curb
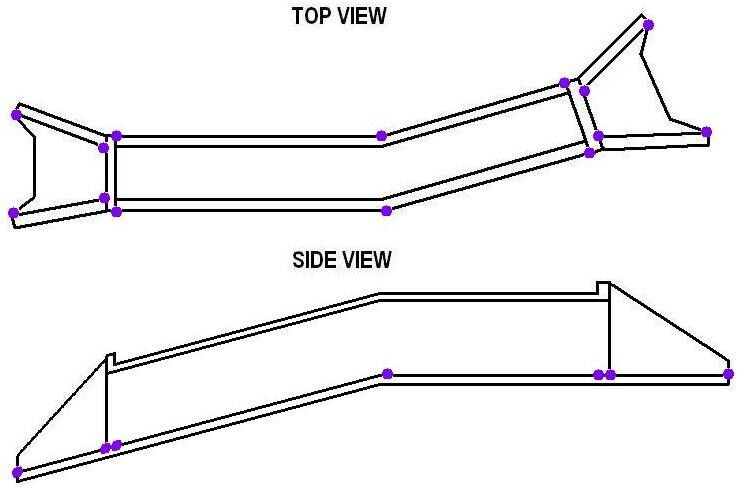
CUL - Culverts
DTM Inclusion (Line = No, Point = No)
This feature is to be used for all reinforced concrete box culverts to draw the culvert in the plan view of the file. These include shots at the outside corner of the barrel on the top back corner of the headwall, both outside edges at any horizontal or vertical breaks and the inside edges on the top of the wing walls. The shots connecting the barrel should form one survey chain and the headwall shots should create an additional two chains.
Culvert shots taken using the PRO feature:
Top of Parapet ( Top of Head wall )
Tops of openings
Top of trough
Flow lines
Dirt, apron, and scour flowlines
Locations/elevations of flowlines at any breaks in the barrel
EXAMPLE: Use the Side Shot function of the data collector
Point Description = 0.22 HDWL, 0.90 x 0.90 x 25.00 RCB, 600mm cir. RCP,
INLET 0.61 x 0.61 x 26.77 RCB, .20 HDWL, 1.0 APRON, .20 x 1.0 para wings
D - Draws, Side Ditches, Gutter Water Flow or Surface Water Flow Downstream
DTM Inclusion (Line = Yes, Point = Yes)
This feature places drainage arrows on a stream, draw, side ditch, gutter, surface water flow, etc. The survey chain should start at the highest elevation of the draw.
EXAMPLE: Use the Side Shot function of the data collector
Point Description = S-D, DW, Gutter FL, etc.
DIK - Center of Dike or Dam
DTM Inclusion (Line = Yes, Point = Yes)
Use this feature to draw a survey chain along the center of a dike or dam. Use the point description field to record the type of structure and the approximate width of the top.
EXAMPLE: Use the Side Shot function of the data collector
Point Description = Centerline 10' wide dike
DTM - Photogrammetry Control Check
DTM Inclusion (Line = No, Point = No)
The terrain model check feature DTM can be used as a single shot. This shot will be used in house to check the accuracy of the finished Data Terrain Model. This feature should be used a minimum of 3 times every 1000 feet in random groups of three. The terrain will determine the need for this feature.
EXAMPLE: Use the Side Shot function of the data collector
Point Description = DTM check shot
DU - Draws, Side Ditches, Gutter Water Flow or Surface Water Flow Upstream
DTM Inclusion (Line = Yes, Point = Yes)
This feature places drainage arrows on a stream, draw, side ditch, gutter, surface water flow, etc. The DU feature can be used to shoot drainage in the opposite direction as feature D. The survey chain should start at the lowest point of the draw.
EXAMPLE: Use the Side Shot function of the data collector
Point Description = S-D, DW, Gutter FL, etc.
EB - Electrical Box
DTM Inclusion (Line = Not Used, Point = No)
Use this feature in ALL surveys when you shoot the center of an electrical pedestal. Use the point description field to describe the dimensions of the box.
EXAMPLE: Use the Side Shot function of the data collector
Point Description = 0. 61 X 1.83 ELECTRICAL BOX
EG - Edge of Gravel Road
DTM Inclusion (Line = Yes, Point = Yes)
This feature code is to be used with a survey chain on all roads with a gravel surface.
EXAMPLE: Use the Side Shot function of the data collector
Point Description = Edge of Rock Road (Optional)
EHW - Extreme High Water
DTM Inclusion (Line = No, Point = No)
Use this feature to record the extreme high water mark.
EXAMPLE: Use the Side Shot function of the data collector
Point Description = Extreme High water June 1993
ELA, ELB, ELC, ELD, ELE - Underground Electric Line
DTM Inclusion (Line = No, Point = No)
Use this feature with a survey chain number to draw underground electric lines. The feature and point description should be consistent with the utility owners in the index file.
EXAMPLE: Use the Side Shot function of the data collector
Point Description = ELA, ELB, ELC, ELD, etc.
ENP - Edge of Entrance, Paved
DTM Inclusion (Line = Yes, Point = Yes)
Use this feature on all paved (asphalt or concrete) entrances and parking lots. Examples of this feature will include all residential entrances, community entrances and community parking lots. The point description should be either AC or Conc.
EXAMPLE: Use the Side Shot function of the data collector
Point Description = Conc or A/C
ENT - Entrance
DTM Inclusion (Line = No, Point = Yes)
Use this feature with a survey chain to shoot the centerline of all entrances.
EXAMPLE: Use the Side Shot function of the data collector
Point Description = Centerline Field Entrance
ENU - Edge of Entrance, Unpaved
DTM Inclusion (Line = Yes, Point = Yes)
Use this feature on all unpaved entrances and parking lots. Examples of this feature will include all residential entrances, community entrances and community parking lots.
EXAMPLE: Use the Side Shot function of the data collector
Point Description = Edge Rock Entrance
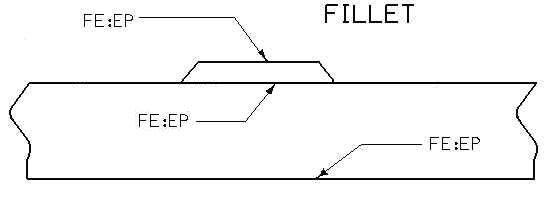
EP - Edge of Pavement
DTM Inclusion (Line = Yes, Point = Yes)
This feature is to be used on all concrete and asphalt state, county, municipal and private roads. Not to be used for edges of paved entrances
EXAMPLE: Use the Side Shot function of the data collector
Point Description = RE (Right Edge) or LE (Left Edge)
EW - Edge of Water
DTM Inclusion (Line = Yes, Point = Yes)
Use this feature with a survey chain to locate the edge of water along all streams at least 10’ wide, ponds and ponding areas, except swamps.
EXAMPLE: Use the Side Shot function of the data collector
Point Description = Edge of Water
FCL - Chain Link or Security Fence
DTM Inclusion (Line = No, Point = No)
Use this feature with a survey chain on any chain link or security fence.
EXAMPLE: Use the Side Shot function of the data collector
Point Description = Fence (Optional)
FHD - Fire Hydrant
DTM Inclusion (Line = Not Used, Point = No)
Use the feature FHD to place a symbol representing a fire hydrant. Take the shot on the center of the hydrant.
EXAMPLE: Use the Side Shot function of the data collector
Point Description = Fire Hydrant (Optional)
FLG - Flag Pole
DTM Inclusion (Line = Not Used, Point = No)
Use this feature to shoot a flag pole. The point description field should describe the base.
EXAMPLE: Use the Side Shot function of the data collector
Point Description = 300mm CIRCULAR CONC BASE
FOA, FOB, FOC, FOD, FOE thru FOJ - Underground Fiber Optics Cable
DTM Inclusion (Line = No, Point = No)
This feature is to be used on all underground fiber optics cables. The feature and point description should be consistent with the utility owners in the index.
EXAMPLE: Use the Side Shot function of the data collector
Point Description = FOA, FOB, FOC, etc.
FP - Filler Pipe
DTM Inclusion (Line = Not Used, Point = No)
This feature will place a symbol at the filler pipe of an underground storage tank. Take one shot on the centerline of the filler cap. Enter the filler pipe dimension in the PD field.
EXAMPLE: Use the Side Shot function of the data collector
Point Description = 27mm Filler Cap (Gas)
FW - Wire Fence (Woven, Barb or High Tension)
DTM Inclusion (Line = No, Point = No)
Use this feature with a survey chain on any fence made of woven, barb, or high tension wire.
EXAMPLE: Use the Side Shot function of the data collector
Point Description = Fence (Optional)
FWD - Wood Fence
DTM Inclusion (Line = No, Point = No)
Use this feature with a survey chain on all board fences.
EXAMPLE: Use the Side Shot function of the data collector
Point Description = Wood Fence (Optional)
GDL - Guardrail
DTM Inclusion (Line = No, Point = No)
Use this feature with a survey chain on all guardrails with a rail or cable.
EXAMPLE: Use the Side Shot function of the data collector
Point Description = Steel guardrail, cable guardrail, etc.
GHA, GHB, GHC, GHD, GHE - Underground Gas High Pressure Line
DTM Inclusion (Line = No, Point = No)
Use this feature with a survey chain on any high pressure buried gas line. The feature code should be consistent with the utility owners in the index file. The point description should be the diameter of the pipe.
EXAMPLE: Use the Side Shot function of the data collector
Point Description = 4" GHA, 4" GHB, 100mmGHC, etc.
GLA, GLB, GLC, GLD, GLE - Underground Gas Line
DTM Inclusion (Line = No, Point = No)
Use this feature with a survey chain on any buried gas, petroleum, or crude oil line that are not under high pressure. The feature code should be consistent with the utility owners in the index file. The point description should be the size of the pipe.
EXAMPLE: Use the Side Shot function of the data collector
Point Description = 4" GLA, 4"GLB, 4"GLC, etc.
GP - Guard Posts (Less Than 4 Posts)
DTM Inclusion – (Line = Not Used, Point = No)
Use this feature for posts that do not have a rail or cable connecting them and should be used when posts are not in a row or there are less than 4 of them. Possible examples of the GP feature could be a row of posts around a parking area or simply 1 or 2 posts placed where they will protect another object. When the feature GP is used the letters GP will be added beside the guardrail symbol. All guard posts in the survey corridor should be located.
Note: Use feature GDL if the posts have a guardrail or a cable.
EXAMPLES: Use the Side Shot function of the data collector
Point Description = Guard Post (Optional)
GPR - Guard Posts (4 Or More Posts)
DTM Inclusion – (Line = Not Used, Point = No)
This is to be used for each post that is in a row of four or more posts. All guard posts in the survey corridor should be located. This feature is also for guard posts without a rail or cable.
EXAMPLES: Use the Side Shot function of the data collector
Point Description = Guard Post (Optional)
GR - Ground Shots (Field Survey)
DTM Inclusion (Line = Not Used, Point = Yes)
Use this feature on all shots that do not have another feature and are good for elevation.
EXAMPLE: Use the Side Shot function of the data collector
GRV - Grave
DTM Inclusion (Line = Not Used, Point = Yes)
The shot should be taken on the centerline of a grave. Note the name on the headstone in the point description.
EXAMPLE: Use the Side Shot function of the data collector
Point Description = Murphy Headstone, etc.
GU - Gutter
DTM Inclusion (Line = Yes, Point = Yes)
When shooting curb and gutter, two survey chains are required. The first gutter survey chain should be at the face of the curb. Draw this line into the curb line at the location of the curb drop. A second gutter survey chain should be used for the edge of the gutter. Use the point description field to describe the overall width of the curb and gutter. The gutter line can be shot through the intakes as if the intake isn't there.
EXAMPLE: Use the Side Shot function of the data collector
Point Description = Con Gutter
GV - Gas Valve or Vent
DTM Inclusion (Line = No, Point = No)
This feature can be used for a gas vent or gas valve. Record the size of valve or vent in the point description field.
EXAMPLE: Use the Side Shot function of the data collector
Point Description = 4" GV, 50mm Cir. G vent., etc.
HDG - Hedge
DTM Inclusion (Line = No, Point = No)
This feature with a survey chain will draw a hedge symbol along the centerline of a hedge. Shoot a shot on the centerline of the hedge, at each end and at each change in direction of the hedge. Use the point description on all shots.
EXAMPLE: Use the Side Shot function of the data collector
Point Description = 1m wide yew hedge
HS - Hydric Soil
DTM Inclusion (Line = No, Point = No)
This feature should be used with a survey chain to delineate a hydric soil use. Wetland employees will flag hydric soils if they need inclusion in our surveys. The point description should note the soil type.
EXAMPLE: Use the Side Shot function of the data collector
Point Description = Hydric Soil
HT - Highline Tower
DTM Inclusion (Line = Not Used, Point = No)
This feature is to be used whenever there is a tower or poles supporting a high voltage power line. The feature is not meant to represent a particular type of pole or tower but to show a high voltage line. If the tower base is square, locate the approximate center. If it is two poles, locate the position approx. ½ way between the poles. The point description should be consistent with the utility owners in the index file. If the elevations of the lines are needed, use the feature UE for them.
EXAMPLE: Use the Side Shot function of the data collector
Point Description = HT, HTA, HTB, etc.
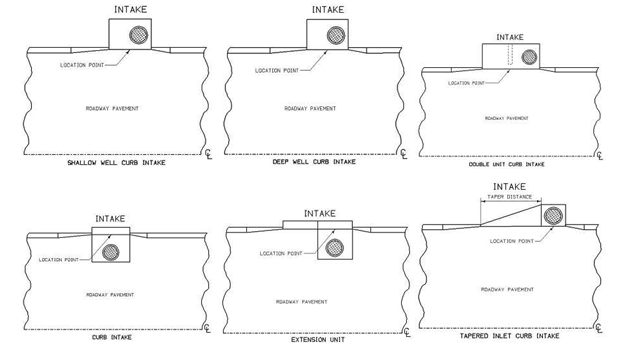
IN - Single Grate Intake
DTM Inclusion (Line = Not Used, Point = No)
Use this feature one time at the Location Point of an intake.
To record elevations lower than the grate, use the feature code UE. Use the point description field to record the grate size. Use good comments to describe other necessary information.
Single Grate:
EXAMPLE: Use the Side Shot function of the data collector
Point Description = 2x4 grate, 2-2x4 grates, conc basin
Double Grate:
EXAMPLE: Use the Side Shot function of the data collector
Point Description = 2x4 grate, 2-2x4 grates, conc basin
IN - SW Type Intake
DTM Inclusion (Line = Not Used, Point = No)
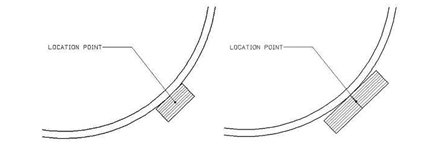
Use this feature one time at the Location Point of an intake. Use the Point Description field to record the dimensions and construction material of the well. Basin and flow line shots should use the feature UE. Use good comments to describe other necessary information.
EXAMPLE OF INTAKE: Use the Side Shot function of the data collector.
Point Description = 1.22X1.22 CONC INTAKE, SURF FL
EXAMPLE OF M.H. AT INTAKE or GRATE AT INTAKE: Use the Side Shot function of the data collector.
Point Description = CENTERLINE 600MM CIR M.H.
INB - Intake (Beehive)
DTM Inclusion (Line = Not Used, Point = No)
This shot should be taken at the center of the intake at the surface flowline. The feature UE should be used for bottom of basin and flow line shots.
EXAMPLE: Use the Side Shot function of the data collector
Point Description = 18" CIR Beehive, 6"φ inlet NE
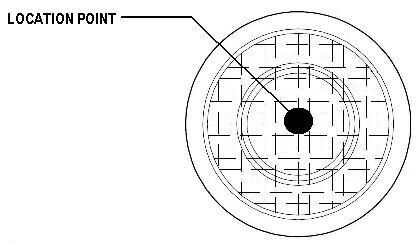
LC - Lot Corner
DTM Inclusion (Line =No, Point = No)
This feature is to be used with lot corners. Note the type of corner that is located in the comments. If a cap with a RLS# is found note it in the comments. Point description should always read lot corner.
EXAMPLE: Use the Side Shot function of the data collector
Point Description = Lot corner, Found ½ in. rebar, 20mm Gas Pipe, etc.
LIN - LINE
DTM Inclusion (Line = No, Point = No)
This feature should be used when you wish to create a line that will not become part of the DTM but will show on the plans. Examples of a line are the begin a/c surf, painted medians, concrete or brick side rails along sidewalks, Railroad crossing mats and expansion joints.
EXAMPLE: Use the Side Shot function of the data collector
Point Description = Begin a/c surf, conc side rail, etc.
LP - LP Tank
DTM Inclusion (Line = Not Used, Point = No)
LP will place an LP tank symbol. Take one shot at the center of the tank. In the point description describe any concrete footings or concrete slab under the tank.
EXAMPLE: Use the Side Shot function of the data collector
Point Description = 1mx3m Conc. Slab
LUM - Luminaire
DTM Inclusion (Line = Not Used, Point = No)
The feature will place a symbol of the pole. Shoot the centerline of each pole.
EXAMPLE: Use the Side Shot function of the data collector
Point Description = LUM POLE
MH - Manhole
DTM Inclusion (Line = Not Used, Point = No)
This feature will place a symbol on the MH location. Enter the diameter of MH in the point description. Use the feature UE to record elevations lower than the manhole.
EXAMPLE: Use the Side Shot function of the data collector
Point Description = 600 Cir. San S. MH
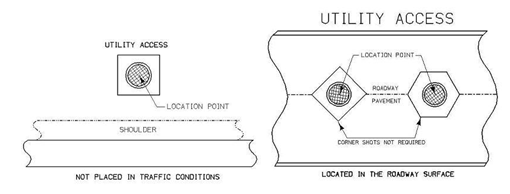
MIS - Miscellaneous
DTM Inclusion (Line = No, Point = No)
The miscellaneous feature is to be used for an object requiring a single shot that does not match any other feature. This feature will be shown on the plans.
NOTE: This feature should be used as infrequently as possible.
EXAMPLE: Use the Side Shot function of the data collector
Point Description = miniature golf course, leach bed etc.
MM - Mile Marker
DTM Inclusion (Line = Not Used, Point = No)
Shoot one shot on centerline of mile marker. Record the mile marker number in the point description.
EXAMPLE: Use the Side Shot function of the data collector
Point Description = MM #212, etc.
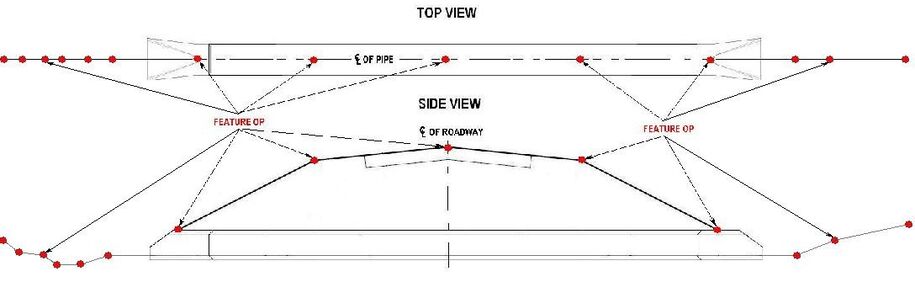
OP – Section Over Pipe
DTM Inclusion (Line = Not Used, Point = Yes)
This feature is used to shoot each breakpoint of the ground over a pipe or culvert. These shots should continue, at the same angle from from centerline as the pipe, out to the survey limits on both the inlet and outlet sides of the pipe or culvert.
All shots that are tagged as feature OP will be plotted on the culvert details. Use the feature PRO on the headwall, top of opening, flow lines, and apron flow lines.
EXAMPLE: Use the Side Shot function of the data collector
Point Description = SKEWED 2x2x45.0 RCB, Etc.
OUT - Outlet
DTM Inclusion (Line = No, Point = No)
This feature is to be used with any pipe drain or tile outlet. Take one shot on the outlet flowline. In the point description, record the size and type of pipe.
EXAMPLE: Use the Side Shot function of the data collector
Point Description = OUT FL 6" Plastic, etc.
PCP - Photo Control Point
DTM Inclusion (Line = Not Used, Point = No)
Use this feature on Photo Control points that are not painted or paneled.
EXAMPLE: Use the Side Shot function of the data collector
PCT - Photo Control Target
DTM Inclusion (Line = Not Used, Point = No
Use this feature on painted targets and photo control panels.
EXAMPLE: Use the Side Shot function of the data collector
Point Description = Painted target
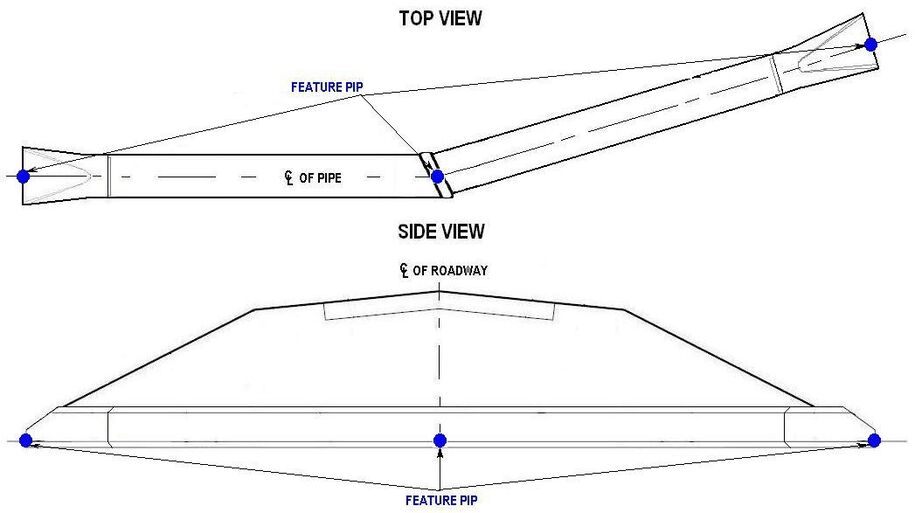
PIP - Pipe
DTM Inclusion (Line = No, Point = No)
Use this feature when shooting all pipes, including reinforced concrete, arch, corrugated metal, cast iron and plastic. Shoot one shot on the centerline of each end of pipe. The description should include type of pipe, diameter and if there is an apron.
Pipe shots taken using the PRO feature:
Tops of openings
Top of trough
Flow lines
Dirt, apron, and scour flowlines
Locations/elevations of flowlines at any breaks in the pipe
EXAMPLE: Use the Side Shot function of the data collector
Point Description = DI 18, CL A1, FL IPL, DA 25, CW F
PL - Photo Location
DTM Inclusion (Line = Not Used, Point = No)
A photo location point is usually a wooden post used as a reference location to take pictures of the wetland site. Pictures of the site are acquired over the five years post construction. Shoot the location of the post. A wetland site may have a large number of Photo Locations. The posts should be marked with something like “P-1” or “P-2” etc. Record the “P-1” or “P-2” label in the point description field.
EXAMPLE: Use the Side Shot function of the data collector
Point Description = Location P-1
PLG - Photo Location General
DTM Inclusion (Line = Not Used, Point = No)
A photo location general point is used to code the location of a digital photo submitted with the Preliminary Survey. Shoot the ground at the location you take the picture. Record the approx. azimuth direction on the line of sight in the comment field and the picture name also in a comment field. Please submit the pictures in a .tif format.
EXAMPLE: Use the Side Shot function of the data collector
Point Description = Inlet of 2x2 RCB, Az 180.0000, rcb10.tif
PPA, PPB, PPC, PPD, PPE - Power Pole
DTM Inclusion (Line = Not Used, Point = No)
Use this feature with any power pole except highline towers. The point description is optional, but if used, should be consistent with the utility owners in the index file.
EXAMPLE: Use the Side Shot function of the data collector
Point Description = PPA, PPB, PPC, etc.
PR - Power Riser Pole
DTM Inclusion (Line = Not Used, Point = No)
This feature will draw a symbol for a power riser pole. What differentiates a power riser pole, versus a standard power pole, is that the riser pole is used to connect an overhead power line to an underground one. The point description should be consistent with the utility owners in the index file.
EXAMPLE: Use the Side Shot function of the data collector
Point Description = Riser Pole
PRO - Top Steps, Porches, Bridge Abutment On CL
DTM Inclusion (Line = Not Used, Point = No)
Use this feature in ALL surveys when a profile type shot is taken. Applications of this feature include profile of a sidewalk, top of step, or porch elevations associated with a sidewalk, the abutment shot under the CL of a bridge or any other random point that you wish to locate that could also be described as some sort of profile shot.
EXAMPLE: Use the Side Shot function of the data collector
Point Description = SWK Profile
REF - Reference
DTM Inclusion (Line = No, Point = No)
This feature is used on all points referenced to a control point.
EXAMPLE: Use the Side Shot function of the data collector
Point Description = CP 154+27.704, 527.361 LT, POINT # 300, SET IRON PIN 0.09 DEEP
RET - Retaining Wall
DTM Inclusion (Line = No, Point = No)
Use this feature with a survey chain to draw a symbol representing a retaining wall. Use the point description field to describe the material and width of the wall. Shoot the split of the retaining wall at both ends and at every jog in the wall.
NOTE: In a DTM survey, shoot a break line on the dirt above and below the retaining wall. The retaining wall will not be part of the ground model. If you shoot scan lines over an area with a retaining wall, the cross section will not jump up at the wall, but the ground will be represented as to the designer’s wishes.
EXAMPLE: Use the Side Shot function of the data collector
Point Description = 2" Wood Plank Ret. wall
RIP - Rip-Rap
DTM Inclusion (Line = Yes, Point = Yes)
Take 2 or more shots with a survey chain number to draw a line along the approximate center of the area. Use the point description for approximate size of rip rap.
EXAMPLE: Use the Side Shot function of the data collector
Point Description = End 3m wide rock rip
ROC - Rock Outcropping
DTM Inclusion (Line = No, Point = No)
Use this feature with a survey chain to draw a line along the edge of the rock outcropping nearest the survey centerline.
EXAMPLE: Use the Side Shot function of the data collector
Point Description = Edge Rock Out, Top Roc or Base Roc, etc.
ROW - Right-of-Way Rail
DTM Inclusion (Line = Not Used, Point = No)
Use this feature to draw a symbol for a row rail. Shoot the near edge of rail (nearest to centerline of highway).
EXAMPLE: Use the Side Shot function of the data collector
Point Description = ROW Rail
RR - Railroad
DTM Inclusion (Line = Yes, Point = Yes)
Use this feature with a survey chain to shoot RR tracks and draw the RR track symbol. The point description should be consistent with the utility index.
EXAMPLE: Use the Side Shot function of the data collector
Point Description = RR, CL RRA, CL RRB, etc.
RRB - Railroad Signal Box
DTM Inclusion (Line = No, Point = No)
Use this feature in ALL surveys when a signal box is shot. Describe the box in the point description. Take the shot on the centerline of the box.
EXAMPLE: Use the Side Shot function of the data collector
Point Description = 300 X 600 RR SIGNAL BOX
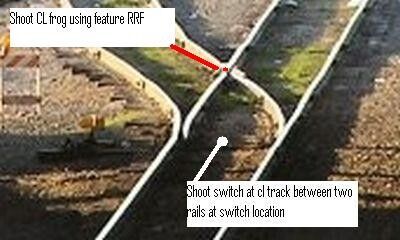
RRF - Railroad Frog
DTM Inclusion (Line = No, Point = No)
Use this feature in ALL surveys when a RR Frog is shot.
EXAMPLE: Use the Side Shot function of the data collector
Point Description = Frog
RRR - Railroad Rail
DTM Inclusion (Line = No, Point = No)
Use this feature on a RR rail shots, including top of rail profiles and at the base of rail shots.
EXAMPLE: Use the Side Shot function of the data collector
Point Description = Top of rail, or base of rail
RRS - Railroad Signal
DTM Inclusion (Line = No, Point = No)
Use this feature to draw a symbol that will represent a RR signal. Shoot the centerline of signal and use the point description to describe the signal.
EXAMPLE: Use the Side Shot function of the data collector
Point Description = RR Signal with Stop Arm, etc.
RRW - Railroad Switch
DTM Inclusion (Line = No, Point = No)
Use this feature to draw a symbol that will represent a RR switch. Shoot the switch and use the point description RR switch. See the picture above for switch location graphic.
EXAMPLE: Use the Side Shot function of the data collector
Point Description = RR Switch
RT - Radio Tower
DTM Inclusion (Line = Not Used, Point = No)
Use this feature to record information on a radio tower. Take one shot on the centerline of tower. Use the point description for tower height and owner.
EXAMPLE: Use the Side Shot function of the data collector
Point Description = 2,000 Ft., KRNT, Des Moines, IA, etc.
S - Soil Sampling Site
DTM Inclusion (Line = Not Used, Point = No)
A soil sampling site is usually defined by a metal post with a plastic sleeve. The sleeve is labeled with a magic marker with something like “S-1” or “S-2” etc. Shoot one shot at the base of the post on the ground. Record the “S-1” or “S-2” marking in the point description field.
EXAMPLE: Use the Side Shot function of the data collector
Point Description = S-1
SAA, SAB, SAC, SAD, SAE - Underground Sanitary Sewer
DTM Inclusion (Line = No, Point = No)
Use these features with a survey chain number to draw a line representing a sanitary sewer. The sanitary sewer pattern will not show the direction of water flow from the lowest point number of the figure to the highest point number in the figure. Therefore, the flow lines of a sanitary sewer, one manhole away from the survey limits, must be shot to determine the grade of sewer lines within the bounds of the survey. The feature code should be consistent with the utility index.
EXAMPLE: Use the Side Shot function of the data collector
Point Description = 15" San, 380mm San1, etc.
SBR - Size of Bridge
DTM Inclusion (Line = Not Used, Point = No)
This shot should be taken at the center point of the bridge. This point is only used to relay the bridge information to later users of the survey information.
EXAMPLE: Use the Side Shot function of the data collector
Point Description = 600 x 24 conc bridge
SCR - Section Corner
DTM Inclusion (Line = Not Used, Point = No)
This feature will draw a symbol for a section corner. Describe the section corner in the point description field. Note the type of corner that is located in the comments. If the stone has been certified as the stone by the District Land Surveyors, make a note in the file. If the point hasn’t been certified make a comment such as Approx stone location.
EXAMPLE: Use the Side Shot function of the data collector
Point Description = NE Cor Sec 25, Found ½ in. rebar, etc.
SEP - Septic Tank
DTM Inclusion (Line = Not Used, Point = No)
This feature will draw a symbol for a septic tank. Take one shot at the approximate centerline of septic tank. Enter the approximate size in the point description.
NOTE: The property owner should be contacted for information regarding the leach bed on the septic tank. If the leach line locations are known use the feature code SAN. Enter the approximate size of the tile in the point description. The MIS feature code can be used to draw a line around the approximate location of a known leach bed.
EXAMPLE: Use the Side Shot function of the data collector FE:SEP
Point Description = 10' Septic
SF - Silt Fence
DTM Inclusion (Line = No, Point = No)
Silt fences located within the perimeter of a wetland survey DTM should be located. Use this feature with a survey chain number to locate the fence.
EXAMPLE: Use the Side Shot function of the data collector
Point Description = Silt Fence
SG - Staff Gauge
DTM Inclusion (Line = Not Used, Point = No)
Defined by a metal post with inch graduations along the side of the post that is used to monitor elevations of a wetland site. Shoot two shots at each location, one shot at the base of the post and another at the zero marking on the post. One shot at the top of the PVC pipe and another inside the PVC on top of the gauge.
EXAMPLE: Use the Side Shot function of the data collector
Point Description = Staff Gauge
SH - Paved Shoulder
DTM Inclusion (Line = Yes, Point = Yes)
This feature is to be used with a survey chain to draw a line along a paved shoulder, either ACC or PCC. The point description should describe the shoulder surface material.
EXAMPLE: Use the Side Shot function of the data collector
Point Description = 3M A/C Shoulder
SHR - Shrub
DTM Inclusion (Line = Not Used, Point = No)
This feature will draw a symbol for a shrub. Use the point description to describe the plant.
EXAMPLE: Use the Side Shot function of the data collector
Point Description = 1M Cir. Yew
SI - Signs
DTM Inclusion (Line = Not Used, Point = No)
Most signs can be located using one shot at the center of the sign. If there is a concrete base or footings describe this in your comments. Do not shoot the corners of the concrete base unless it is very large.
EXAMPLE: Use the Side Shot function of the data collector
Point Description = Motel sign, 1M Cir. Conc. Base
SL - Speed Limit Sign
DTM Inclusion (Line = Not Used, Point = No)
Use this feature for all speed limit signs to draw a symbol. Use the point description to record the speed limit of the sign.
EXAMPLE: Use the Side Shot function of the data collector
Point Description = 25 MPH
SLN - Approximate Section Line
DTM Inclusion (Line = No, Point = No)
Use this feature with a survey chain to draw a section line. If the section corners have been located, use them with a survey chain number. If this section line is an approximation, note so in the point description.
EXAMPLE: Use the Side Shot function of the data collector
Point Description = ½" Iron Pin, 20mm Gas Pipe, Approx. Sec. Line etc.
SLO - Silo
DTM Inclusion (Line = Not Used, Point = No)
Use this feature for a silo. Shoot one shot on the center of the silo. The diameter of the silo should be in the point description.
EXAMPLE: Use the Side Shot function of the data collector
Point Description = 6.1M Silo
SNK - Sink Hole
DTM Inclusion (Line = Not Used, Point = Yes)
Use this feature on all sink holes. Shoot one shot on the approx. center of a sink hole. Use the point description to note the diameter of the sink hole.
NOTE: In a DTM survey use the BL feature with a survey chain number to draw a line around the rim of a sink hole.
EXAMPLE: Use the Side Shot function of the data collector
Point Description = 30M Dia. Sink Hole
SNP - Non-Paved Shoulder
DTM Inclusion (Line = Yes, Point = Yes)
This feature is to be used with a survey chain to draw a line along a non-paved shoulder, either granular or earthen. The point description should describe the shoulder surface material.
EXAMPLE: Use the Side Shot function of the data collector
Point Description = 3M Gran Shoulder
SOP - Size of Culvert or Pipe
DTM Inclusion (Line = Not Used, Point = No)
This shot should be taken at the center of pipe and centerline of road intersection. This point is only used to relay the pipe or culvert information to later users of the survey information.
EXAMPLE: Use the Side Shot function of the data collector
Point Description = 4 x 4 x 25.5 RCB
SP - Stream Profile
DTM Inclusion (Line = Not Used, Point = Yes)
Use this feature on stream bed profile points. Use the point description field to describe the linear distance up or downstream from the survey centerline.
EXAMPLE: Use the Side Shot function of the data collector
Point Description = 100’ upstream
STA, STB, STC, STD, STE - Underground Storm Sewer
DTM Inclusion (Line = No, Point = No)
Use these features with a survey chain to draw storm sewer lines. This feature will draw a line on the storm sewer location. The storm sewer pattern will not represent the direction of water flow. Therefore, a flow line of a storm sewer one manhole outside the survey limits must be shot to determine the grade of a storm sewer line within the bounds of the survey. Use the point description for size of line. Shoot all points lower than the MH with feature UE.
EXAMPLE: Use the Side Shot function of the data collector
Point Description = 15" SS, 15" SS1, etc.
STP - Stump
DTM Inclusion (Line = Not Used, Point = No)
This shot should be taken at the center of a stump. Use the point description for stump size.
EXAMPLE: Use the Side Shot function of the data collector
Point Description = 600mm Stump
SWK - Sidewalk
DTM Inclusion (Line = Yes, Point = Yes)
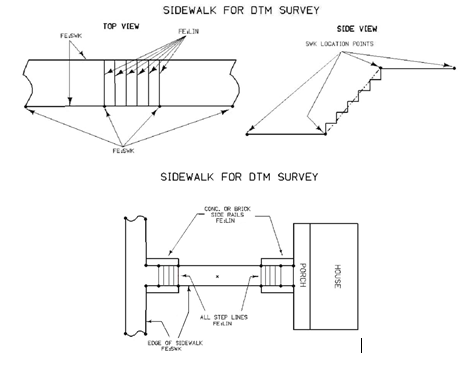
Use this feature with a survey chain number to draw the edge of a sidewalk. The point description should include the width of the sidewalk. Use the feature code LIN to show the location of stairs.
EXAMPLE: Use the Side Shot function of the data collector
Point Description = 1.22m Sidewalk
SWP - Swamp
DTM Inclusion (Line = Yes, Point = Yes)
Use this feature with a survey chain number to draw a line around the edge of a swamp.
EXAMPLE: Use the Side Shot function of the data collector
Point Description = Swamp
TA - Tower Anchor
DTM Inclusion (Line = Not Used, Point = No)
Use this feature for any tower anchor including radio tower, grain elevator tower, etc. Use the point description for anchor footing size.
EXAMPLE: Use the Side Shot function of the data collector
Point Description = 1.22 x 1.22m Conc. Anchor
TBO - Telephone Booth
DTM Inclusion (Line = Not Used, Point = No)
Use this feature to shoot the center of a telephone booth or a drive up phone. Use the point description to describe the phone.
EXAMPLE: Use the Side Shot function of the data collector
Point Description = DRIVE UP PHONE
TCB - Traffic Signal Control Box
DTM Inclusion (Line = No, Point = No)
Use this feature to shoot the center of a control box. Use the point description to describe the box.
EXAMPLE: Use the Side Shot function of the data collector
Point Description = 300 x 600 TRAFFIC BOX
TDC - Deciduous Tree
DTM Inclusion (Line = Not Used, Point = No)
Use this feature to draw a symbol for a deciduous tree. Record the type and size information in the point description field.
EXAMPLE: Use the Side Shot function of the data collector
Point Description = 24" Oak
TDL - Traffic Detection Loop
DTM Inclusion (Line = No, Point = No)
Use this feature to draw a symbol for a traffic detection loop. Record enough points in a survey chain to draw the loop.
EXAMPLE: Use the Side Shot function of the data collector
Point Description = Traffic Detection Loop
TER - Centerline of Terrace
DTM Inclusion (Line = Yes, Point = Yes)
Use this feature to when shooting the centerline of a field terrace.
NOTE: In DTM surveys, break-lines will need to be shot along the bases of the terrace and along the top edges of the terrace with the feature code BL.
EXAMPLE: Use the Side Shot function of the data collector
Point Description = 3m Wide Terrace
TEV - Tree Evergreen
DTM Inclusion (Line = Not Used, Point = No)
Use this feature to draw a symbol for an evergreen tree. Record the type and size information in the point description field.
EXAMPLE: Use the Side Shot function of the data collector
Point Description = 18in Scotch Pine
TFR - Tree Fruit
DTM Inclusion (Line = Not Used, Point = No)
Use this feature to draw a symbol for a fruit tree. Record the type and size information in the point description field.
EXAMPLE: Use the Side Shot function of the data collector
Point Description = 12in Cherry Tree
TGP - Telegraph Pole
DTM Inclusion (Line = Not Used, Point = No)
Use this feature to draw a symbol for a telegraph pole. The shot should be taken on the centerline of the pole. The feature code should be consistent with the utility owners listed in the utility index file. The point description is optional, but if used should also be consistent with the utility owners in the index file.
EXAMPLE: Use the Side Shot function of the data collector
Point Description = Burlington Northern Railroad
TIL - Tile
DTM Inclusion (Line = No, Point = No)
Use this feature to draw a line along a tile location. Use the point description field to record the size of the tile line. If the size of tile is unknown, enter an approximate dimension in the point description field.
EXAMPLE: Use the Side Shot function of the data collector
Point Description = 6 in VIT Tile, etc.
TLA, TLB, TLC, TLD, TLE - Underground Telephone Line
DTM Inclusion (Line = No, Point = Yes)
Use these features with a survey chain to draw underground telephone wires. The feature code should be consistent with the utility owners listed in the utility index file. The point description should be consistent with the utility legend in the index file.
EXAMPLE: Use the Side Shot function of the data collector
Point Description = TLA, TLB, TLC, etc. (Needed)
TLNL - Treeline Left
DTM Inclusion (Line = No, Point = Yes)
Use this feature with a survey chain to draw the treeline symbol along the edge of a timber. This feature will draw the treeline symbol to the left. This means that you should this feature if the centerline is to the left of the starting point of your survey chain. A point description is not necessary with this feature but one may be used if desired. This feature should not be used with a single row of trees. Trees with a single row should be one of the following TDC, TFR or TEV.
EXAMPLE: Use the Side Shot function of the data collector
Point Description = Tree Line Left
TLNR -Treeline Right
DTM Inclusion (Line = No, Point = Yes)
Use this feature with a survey chain to draw the treeline symbol along the edge of a timber. This feature will draw the treeline symbol to the right. You should this feature if the centerline is to the Right of the starting point of your survey chain. A point description is not necessary with this feature but one may be used if desired. This feature should not be used with a single row of trees. Trees with a single row should be one of the following TDC, TFR or TEV.
EXAMPLE: Use the Side Shot function of the data collector
Point Description = Tree Line Right
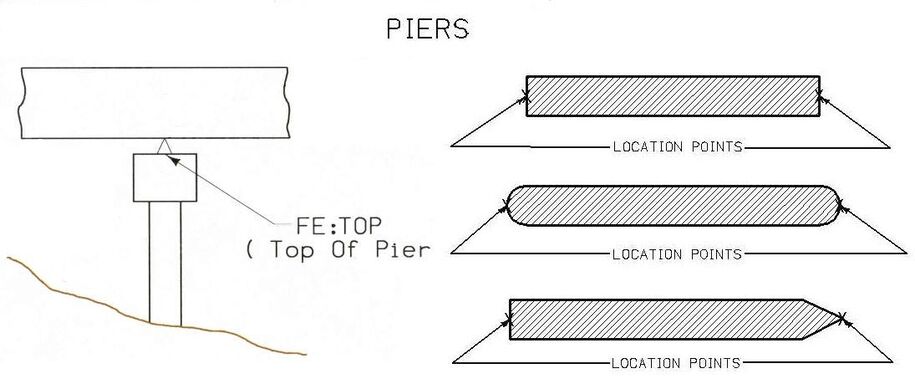
TOP - Top Bridge Pier
DTM Inclusion (Line = Not Used, Point = No)
Use this feature to shoot points on the top of bridge piers.
EXAMPLE: Use the Side Shot function of the data collector
Point Description = Top of Brg Pier
TPA, TPB, TPC - Telephone Pole
DTM Inclusion (Line = Not Used, Point = No)
Use these features to draw a symbol for a telephone pole. Shoot the shot on the centerline of the pole. The feature code should be consistent with the utility owners listed in the utility index file.
EXAMPLE: Use the Side Shot function of the data collector
Point Description = TPA, TPB, TPC, etc. (Optional)
TPD - Telephone Pedestal
DTM Inclusion (Line = Not Used, Point = No)
Use this feature to draw a symbol for a telephone pedestal. Shoot the shot on the centerline of the pedestal. The point description should be consistent with the utility owners in the index file.
EXAMPLE: Use the Side Shot function of the data collector
Point Description = TPA, TPB, TPC, etc.
TR - Telephone Riser Pole
DTM Inclusion (Line = Not Used, Point = No)
This feature will draw a symbol for a telephone riser pole. A telephone riser pole is different from a regular pole in that it connects an overhead telephone line to an underground line.The point description should be consistent with utility owners in the index file.
EXAMPLE: Use the Side Shot function of the data collector
Point Description = TRA, TRB, TRC3 etc.
TRL - Centerline of Trail
DTM Inclusion (Line = Yes, Point = Yes)
Use this feature along with a survey chain to draw a line along the centerline of a trail. Use the point description to record the approximate width of the trail.
EXAMPLE: Use the Side Shot function of the data collector
Point Description = 10' wide Trail, 6' Natural Trail, etc.
TSB - Telephone Switch Box
DTM Inclusion (Line = Not Used, Point = No)
Use this feature to shoot the center of a switch box. Use the point description to describe the box.
EXAMPLE: Use the Side Shot function of the data collector
Point Description = 100 X 600 TEL SWITCH BOX
TSG - Traffic Signal
DTM Inclusion (Line = Not Used, Point = No)
Use this feature to draw a symbol on a traffic signal without a luminaire. Shoot the centerline of the signal and use the point description to describe the it.
EXAMPLE: Use the Side Shot function of the data collector
Point Description = Traf. Signal W/2' C. Base, etc.
TSL - Traffic Signal With Luminaire
DTM Inclusion (Line = Not Used, Point = No)
Use this feature to draw a symbol of a traffic signal with luminaire. Shoot the centerline of the signal and use the point description to describe it.
EXAMPLE: Use the Side Shot function of the data collector
Point Description = Traf. Signal W/2' C. Base, etc.
TV - Satellite dish
DTM Inclusion (Line = Not Used, Point = No)
Use this feature to draw a symbol for a TV satellite dish. Take the shot on the centerline of a satellite dish. Use the point description to enter a concrete base size.
EXAMPLE: Use the Side Shot function of the data collector
Point Description = 4x4 Conc. Base, 600mm circular conc. base, etc.
TVA, TVB, TVC, TVD, TVE - Underground TV Cable
DTM Inclusion (Line = No, Point = No)
Use this feature with a survey chain to draw underground TV Cables. The feature code used should be consistent with the utility legend in the index file.
EXAMPLE: Use the Side Shot function of the data collector
Point Description = TVA, TVB, TVC etc.
TVP - TV Pedestal
DTM Inclusion (Line = Not Used, Point = No)
Use this feature to draw a symbol for a TV pedestal. Take the shot on the centerline of the pedestal. The point description is optional. The point description should be consistent with the the index file.
EXAMPLE: Use the Side Shot function of the data collector
Point Description = TVA, TVB, TVC, etc. (Optional)
TW - Top of Water
DTM Inclusion (Line = Not Used, Point = No)
Use this feature on top of water shots. Use the point description field to describe the linear distance up or downstream from the survey centerline.
EXAMPLE: Use the Side Shot function of the data collector
Point Description = Top of Water
UB - Utility Box
DTM Inclusion (Line = Not Used, Point = No)
This feature should be used when you locate any utility box that we do not have a specific feature code for. Take the shot at the center of the box and include a description.
EXAMPLE: Use the Side Shot function of the data collector
Point Description = 2x4 TV Cable Box on conc. Slab, Owner
UE - Utility Elevation
DTM Inclusion (Line = Not Used, Point = No)
The feature UE is used when a utility elevation is located. Usually the UE is lower than the ground feature located above it. The UE feature is used on shots such as bottom of basin or flow lines at ground features such as Storm Sewers (STA), Sanitary Sewers (SAA), Telephone Utility Access (UB), all types of grate Intakes (IN), Bee Hive intakes (INB), Manholes (MH), The feature UE is also used at Highline Towers (HT)when the electrical wires are located (HT).
EXAMPLE: Use the Side Shot function of the data collector
Point Description = FL SANA, Owner
UST - Underground Storage Tanks
DTM Inclusion (Line = Not Used, Point = No)
Use this feature to draw a symbol for an underground storage tank. Shoot the approximate centerline of the UST location. Use the point description to enter the tank volume information.
EXAMPLES: Use the Side Shot function of the data collector
Point Description = 4,000 Gal, Approx. Location
UV - Utility vault
DTM Inclusion (Line = No, Point = No)
Use this feature with a survey chain to shoot the perimeter of a utility vault. Use the point description to describe the vault. Record all elevations below the manhole lid with a feature UE.
EXAMPLE: Use the Side Shot function of the data collector
Point Description = 6.0 X 2.0 TEL VAULT
VS - Valley Section
DTM Inclusion (Line = Not Used, Point = Yes)
Use this feature on all shots in a valley section.
EXAMPLE: Use the Side Shot function of the data collector
WC – Wild Card
DTM Inclusion (Line = Not Used, Point = No)
This feature should be used for all shots that you want to shoot but do not want shown on the plans. This will mainly be used for control checks such as backsights, elevation checks, etc.
EXAMPLE: Use the Side Shot function of the data collector
Point Description = BS, EC, etc.
WEL - Well
DTM Inclusion (Line = Not Used, Point = No)
This feature should be used for monitoring wells at filling stations. Use the point description for size of lid. This feature should also be used for monitoring wells on wetland sites. Each monitoring well also has a calibration mark. Shoot one shot at the calibration mark and another on the rim of the PVC well. Record any labels found on the well in the point description field.
EXAMPLE: Use the Side Shot function of the data collector
Point Description = 4x4 Wood Lid, Not in use, etc.
WHD - Water Hydrant
DTM Inclusion (Line = Not Used, Point = No)
This shot should be taken at the center of the fire hydrant.
EXAMPLE: Use the Side Shot function of the data collector
Point Description = Use if there is concrete base information
WHU - Water Hookup
DTM Inclusion (Line = No, Point = No)
Use for water hook ups or hydrants. Associated with RV parks or camp grounds.
EXAMPLE: Use the Side Shot function of the data collector
Point Description = WATER HOOK UP
WLA, WLB, WLC, WLD, WLE - Underground Water Line
DTM Inclusion (Line = No, Point = No)
Use this feature with a survey chain to draw underground water lines. The feature code should be consistent with the property owners in the index file.
EXAMPLE: Use the Side Shot function of the data collector
Point Description = 4 in WLA, etc.
WM - Wind Mill
DTM Inclusion (Line = Not Used, Point = No)
Use this feature for windmills. Take one shot on the centerline of windmill. Use the point description field to record the base dimensions of the windmill.
EXAMPLE: Use the Side Shot function of the data collector
Point Description = 15x15 Conc. Base
WV - Water Valve
DTM Inclusion (Line = not Used, Point = No)
This feature can be used for a vent or valve. Record the size of the valve and the ownership information in the point description field.
EXAMPLE: Use the Side Shot function of the data collector
Point Description = 4" WV, 3" Cir. WV, WA, WB, etc.
Back to top